Kaseya VSA Deployment Procedure
Learn how AutoElevate's Kaseya VSA deployment procedure works as well as the installation process

Written by Owen Parry
Updated at September 2nd, 2025
Table of Contents
This document explains how AutoElevate's official Kaseya VSA deployment procedure works and how to install the procedure.
This procedure will pass the appropriate Company and location names to the MSI agent installer, allowing our system to auto-create Companies and locations during deployment. There is no need to manually create any Companies or Locations in the AutoElevate Admin Portal first. If you use the AutoElevate BMS PSA ticketing integration, you will likely need to set up the Company and location variables shown below.
Procedure Installation
There are two procedures that you can choose from:
Download the autoelevate-agent-deployment-procedure_2025.xml here
Download the Procedure_Autoelevate_Agent_Deployment_2025_Silent_-_no-prompts.xml here
Use the Silent (No Prompts) procedure to set up Company and location name variables for better automation (recommended).
-
Download the Kaseya VSA .xml procedures you prefer above.
2. Import the procedures. More info on importing Kaseya's VSA procedures can be found on Kaseya's website here.
3. You should now see the AutoElevate Agent Deployment procedures in the correct folder.
License Key Variable
- Copy your license key from the AutoElevate Admin Portal by navigating to the Settings screen and click the Copy to Clipboard link on the License Key item in the General Section.
- Add your AutoElevate license key as a variable in the VSA Variable Manager. More info on the VSA Variable Manager can be found on Kaseya's website here.
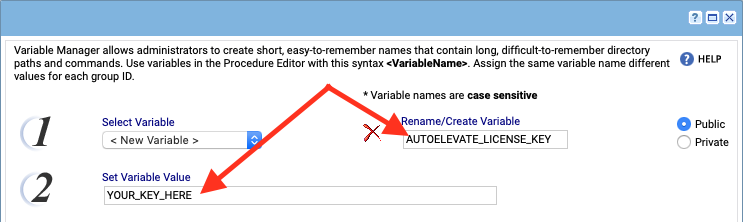
- Click the Manage Variables button:

- Create a < New Variable > named AUTOELEVATE_LICENSE_KEY and paste the license key copied from the AutoElevate Admin Portal into the Set Variable Value box and select Public if you want other VSA users to be able to access this variable
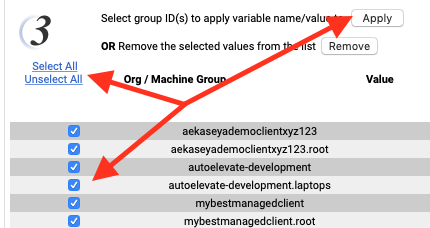
- Select all of the Org / Machine Groups that you want this variable to apply to, you will typically want to Select All here and press the Apply button:
Company & Location Variables for BMS PSA Integration Users
At this point, you could begin to deploy. You can input the Company and location names on each procedure execution, which may be good for one-off installations, but for a more long-term sustainable approach and to avoid variation and misspellings in your inputs, it would be better to set up the appropriate variables to accomplish this automatically.
Why should I go through the extra steps of setting up these variables?
If you don't set up the variables and don't input the names at procedure execution, then the script will, by default, pass along the Org / Machine Group name as the Company Name, and it will default the Location Name as Main. This will be faster in the short term but may not be desirable since the Org / Machine Group names can be quite unfriendly, such as aekaseyademoclientxyz123.root instead of something like AE Kaseya Demo Client XYZ 123.
More importantly, if you use Kaseya BMS as your PSA, the Company Name and Location Name must match the Account and Location names in BMS for the links to be properly made and tickets to be properly created. Therefore, we recommend setting up the appropriate AE_COMPANY_NAME and AE_LOCATION_NAME variables for each Org / Machine Group in the VSA Variable Manager so that the defaults are not used.
Company Variable Setup in VSA
- Click the Manage Variables button as you did earlier for the License Key.
- Create a < New Variable > named AE_COMPANY_NAME and enter a friendly name for a specific Company into the Set Variable Value box. If you are using Kaseya BMS as your PSA integration, make sure the name matches the corresponding Account record in BMS. Don't forget to select Public if you want other VSA users to be able to access this variable.
- Select all of the Org / Machine Groups you want this variable to apply, and you will want only to select the groups that apply to this specific Account and press the Apply button.
Location Variable Setup only if using BMS PSA Integration
If you need to define unique Locations for specific Accounts (Companies), please use the following instructions:
-
Click the Manage Variables" button (just as you did earlier for the License Key).
- Create a < New Variable > named AE_LOCATION_NAME and enter a friendly name for a specific location into the Set Variable Value box. If using Kaseya BMS as your PSA integration, ensure the name matches the corresponding Location record in BMS. Don't forget to select Public if you want other VSA users to be able to access this variable.
- Select all of the Org / Machine Groups that you want this variable to apply to, and you will want only to select the groups that apply to this specific Location and press the Apply button.
If you only have a single Location under each Account in BMS that uses a common name, then you can create a variable using the steps above, but instead of only selecting specific Org / Machine Groups, use the Select All button to add it for all groups.
You're ready to deploy!
Congratulations, your AutoElevate Agent Deployment Procedure is ready to use. Schedule it to run and watch your Companies, Locations, and Computers appear in the AutoElevate Admin Portal