Halo PSA - API Application for AutoElevate Integration Setup
Learn how to set up an API Application for integrating AutoElevate with your Halo PSA system. This article provides step-by-step instructions to help.

Written by Daniel Rivera
Updated at August 5th, 2025
Table of Contents
The Process
Once the API token has been set up and AutoElevate is successfully communicating with your Halo PSA account, you will be able to complete the configuration and integration via the admin portal.
How to Setup the Halo API Application
In your Halo web portal, create an API application for your AutoElevate integration by doing the following:
- On the left, go to Configuration> Integrations> HaloPSA API> Applications> New
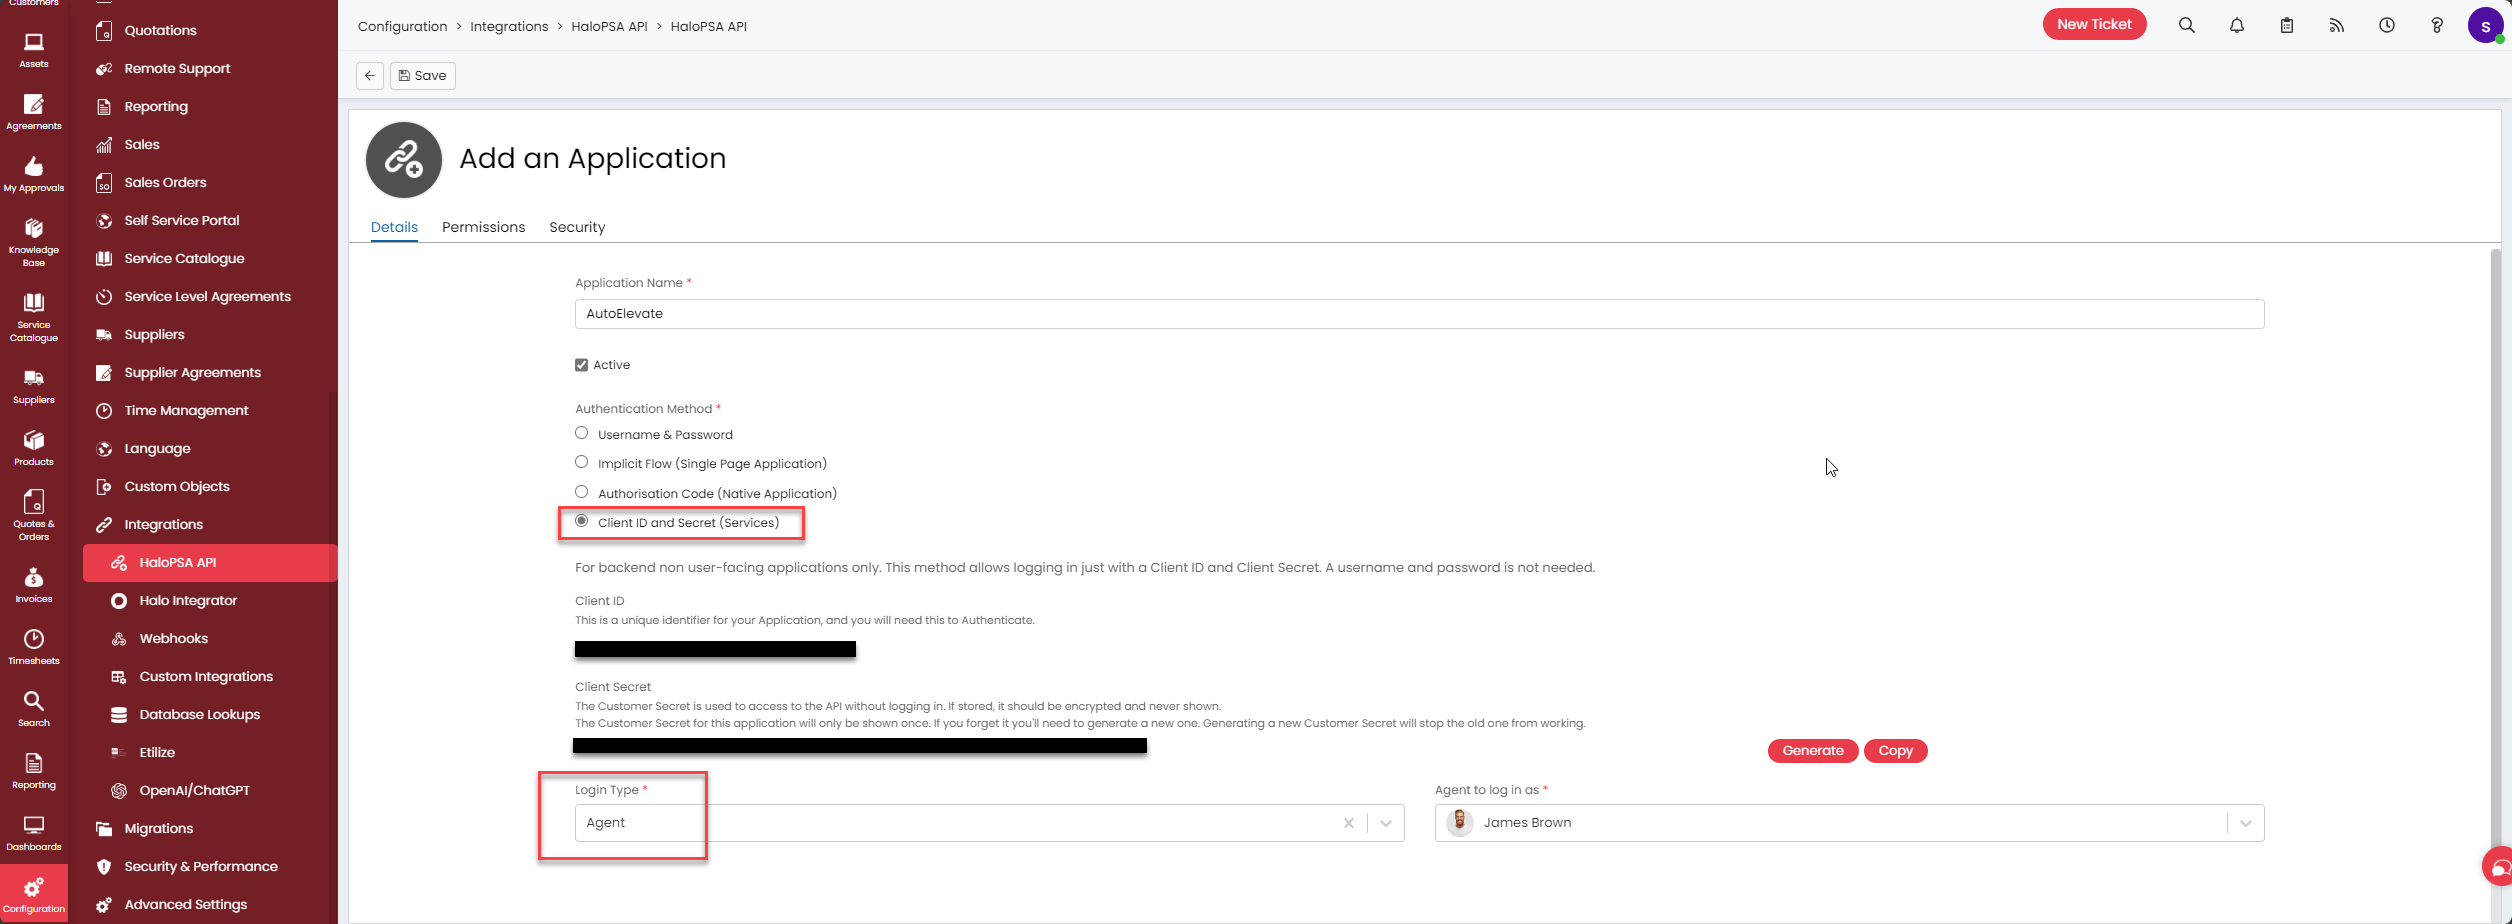
- Create an Application
- Select Authentication Method of Client ID and Secret (Services)
- Select Login Type of Agent
-
Agent to log in as * option cannot be set to None
- NOTE: An API-only agent can be used here.
- See instructions below for steps to configure an API-only agent
- See instructions below for steps to configure an API-only agent
- NOTE: An API-only agent can be used here.
- Under the Permissions tab select:
- read:ticket
- edit:tickets
- read:customer
-
read:assets
- Copy the Client ID and Client Secret from the Details tab
- Click Save and allow a few seconds to pass for data to propagate
- Continue to the AE Admin portal to complete configuration setup
AutoElevate Admin Portal
You will see the Start Setup button in the top section of your Settings screen on the Ticketing System item.
The guide should walk you through completely, but please reach out to support@autoelevate.com if you need any assistance.
Configure an API-only Agent
For the API-only Agent being used, be sure to set the appropriate “Departments" and/or "Teams” (whichever is needed) so that the agent is able to Read & Update tickets being created for the Ticket Type that you will select in the configuration setup.
- If selecting Teams, the following options on the “Team-Agent Relationship" should be activated:
- Can be assigned to
- Can see Unassigned Tickets for this Team
- Can see Tickets assigned to other Agents in this Team
- If selecting Departments, the following options on the “Department-Agent Relationship” should be set:
- Membership Level: View All (some configurations may require “Modify All” if does not update ticket)
The following permissions must be set (either via a “Role” or the Permissions tab):
- Feature Access:
- Tickets Access Level: Read and Modify
- Client Access Level: View (Names Only)
- Assets Access Level: Read Only
- Tickets Permissions:
- Can add new Tickets: Yes
- Can view Unassigned Tickets: Yes
- Can view Tickets that are assigned to other Agents: Yes
- Can Re-assign Tickets: Yes
- NOTE: Set this to No if you don't want tickets to be assigned to the user who responded to the AE Request.
- Can assign to Agents in Teams the Agent is not a member of: Yes
- Can Edit Tickets Which Are Not Assigned To Them: Yes
- Can always update Ticket Statuses and re-assign Tickets outside of actions: Yes
Post Setup - Linking
Company linking is required for the integration to generate tickets in your Halo system. You can also link Locations, Computers and Users for additional information to be included to the ticket but is not required.
- COMPANY LINKING
- When a new Company is created, it will "link" when the Company name in AE matches the Customer name in Halo automatically. If they don't link automatically, you can manually link them up to accounts in Halo by matching the Customer name for the company in Halo to the Company name in AutoElevate. This can be checked by looking in the Company screen and seeing True in the column Linked to Ticketing System.
If it is False and is not matching it will need to be edited and then linked. - To do so: Click edit next to the Company name (in our system) and edit the name to match the Halo Customer.
Once it is matching the Account name found in Halo exactly - from our Admin Portal check the box next to the Company record, go to the Action menu (at the top) and select Link under Ticketing System. This should result in it saying True in the column Linked to Ticketing System.
If the way the Company name appears is not desirable, you can simply use the procedure above to link the record, and then once it's linked, change the name back to the way you want it displayed.
- When a new Company is created, it will "link" when the Company name in AE matches the Customer name in Halo automatically. If they don't link automatically, you can manually link them up to accounts in Halo by matching the Customer name for the company in Halo to the Company name in AutoElevate. This can be checked by looking in the Company screen and seeing True in the column Linked to Ticketing System.
- LOCATION LINKING
- Location linking works the same as Company linking, but the AE Location will match up to the Halo Customer Site.
- NOTE: In order for tickets to be created for a given Computer, the Company that it belongs to MUST be linked.
- COMPUTER LINKING
- Computer linking is based on the AE Computer name matching the name on the Halo Asset. You can manually link them just as you do for Companies. Computer linking is used to allow us to associate a ticket with the Asset that it corresponds to in Halo.
- NOTE: The Computer's Company must first be linked before a link can be made for the Computer. It is not required that a Computer be linked for tickets to be created.
- USER LINKING
- User Linking is based on the email address in our Admin Portal matching to the email for the Agent in Halo. If you ever have one that doesn't link, adjust the User's email address on our system or from Halo so they match and then from the Users screen go to the Actions menu and select Link. If successful it should show as True for Linked to Ticketing System.
- When you create additional users (technicians) in AutoElevate it will auto-link to your employees in Halo using the email addresses.
- NOTE: User linking is required for Time Entries on Actions to have the owner specified as the AE technician who approved/denied the Request.
Technician Mode Ticketing
Please note, Technician Mode Ticketing is currently not available.