N-able N-central Deployment Files and Setup
To deploy agents from your N-able N-central system, you can use the attached AMP file and following instructions

Written by Owen Parry
Updated at September 22nd, 2026
Table of Contents
Overview
The automation policy for N-central RMM will deploy AutoElevate to any scriptable agent, with parameter prompts for your AutoElevate License Key, Company Name, Location (logical group of machines, i.e., Atlanta, Dallas, Laptops, Desktops, or Lab Computers, etc.), and Agent Mode (Audit, Live, or Policy).
How It Works
- Checks to see if the AutoElevate Agent service is running and quits if it is already running.
- If it is not running, it will then download the file from AutoElevate’s latest-build endpoint, where the most current Agent can always be found, and save it to the system temp folder
- Runs an embedded PowerShell one-line script with a few parameters defined like the variables passed in from the run, along with the install path from the temp folder where it was downloaded.
- Runs the following PowerShell with the variables from the script run
Start-Process msiexec.exe "/I `"$installer`" /quiet /lv `"$logfile`" LICENSE_KEY=`"$lickey`" COMPANY_NAME=`"$compname`" LOCATION_NAME=`"$locgroup`" ELEVATION_MODE=`"$agentmode`" BLOCKER_MODE=`"$blockmode`"" -Wait
- Verifies that the registry key exists for AutoElevate to make sure it’s installed
Steps To Import Automation Policy
Download the AutoElevate_Agent_Deployment_2026.amp file HERE
Running The Automation Policy
In N-central, from the top Service Organization level, on the Configuration menu go to Scheduled Tasks -> Script/Software Repository and click Add -> Automation Policy, then select the .amp file that you downloaded above. It will create the policy AutoElevate Agent Deployment in the list. (See basic steps in the attached picture)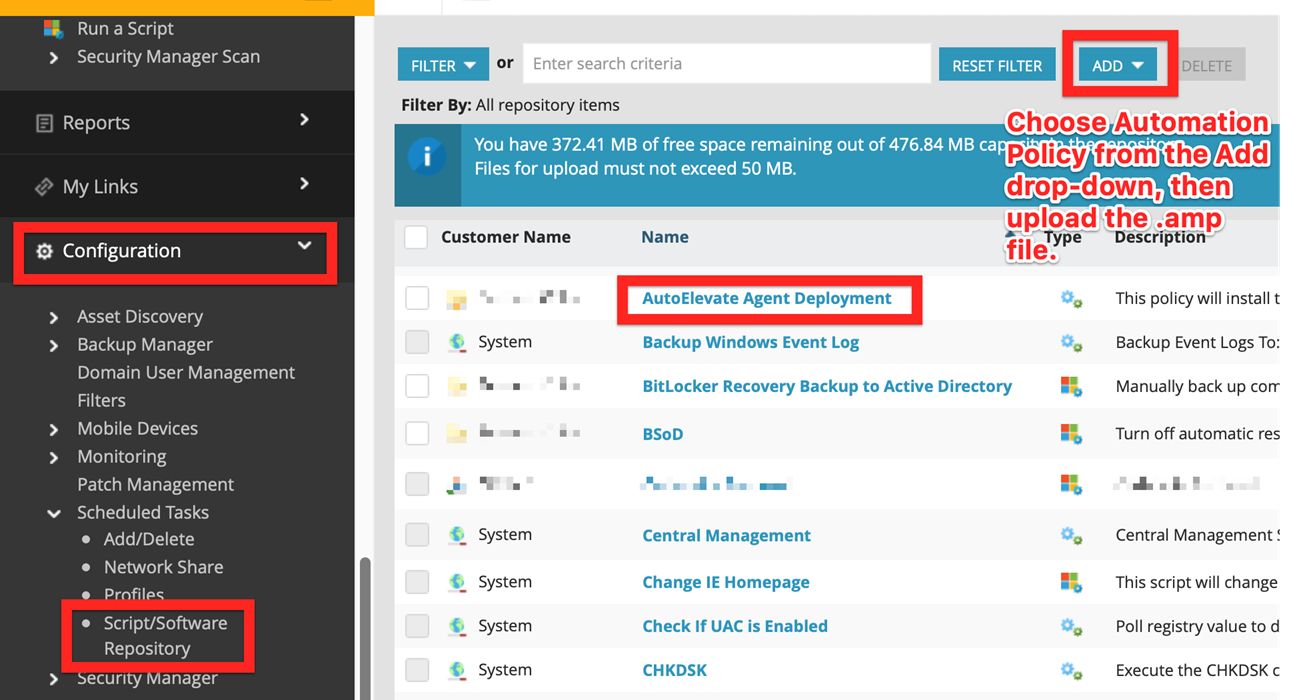
Run the Automation Policy through any standard method. When you choose it from the list (as pictured above), it will prompt for the five variables:
-
License key
-
Company Name (If you use a PSA system such as ConnectWise Manage make sure the name you specify matches the Company ID in CWM or the correct criteria to match and “Link” the Company. Please reference the documentation for your particular PSA system).
-
Blocker Mode ("Disabled", “Audit”, “Live”)
-
Locations
- Agent Mode (“Audit”, “Policy”, or “Live”)
You can either type in the variables or copy & paste them from the AutoElevate Admin Portal Companies & Settings screens (i.e., License key, Company Name, Locations) and type in whether the Agent should run in Audit, Policy, or Live mode and then click Run.
Simplify the Installation Process
To simplify the installation process for each client, In N-central, go to Administration > Custom Properties to add a new organization-level custom property named AutoElevate License Key with your license key as the default. It’s easy to select this key as one of the parameters when running the automation policy. You can add more custom fields for the other variables to make selecting them easier than just typing, but that would depend on your usage.